Elevate Your Drive: A Comprehensive Guide to Car Audio System Installation
Upgrading a car stereo can significantly improve the driving experience. Superior audio quality and innovative features, such as Bluetooth connectivity, are strong motivations for numerous drivers. However, selecting the right stereo and confirming it fits the car's configuration can be somewhat demanding. Additionally, proper installation is essential to prevent frequent mistakes. Understanding these elements can enhance both the acoustic performance and the general pleasure of driving. What approach should be taken to successfully carry out this modification?
Why Upgrade Your Car Stereo?
Replacing a car stereo can substantially improve the overall driving experience, as people often look for superior sound quality and contemporary features. Most drivers find that stock audio systems lack the audio clarity and power they desire. An upgraded stereo ensures better bass, treble, and overall audio balance, revolutionizing the listening experience.
Moreover, modern car stereos offer integration options such as Bluetooth, USB connections, and smartphone detailed article application support, permitting effortless integration with personal devices. This permits users to easily access their favorite music, podcasts, and navigational tools with ease.
Furthermore, a new stereo can feature sophisticated functions like touch-operated interfaces, personalized audio equalizers, and built-in navigation, making it easier to find details while behind the wheel. With the ongoing advancement of technology, investing in a car stereo upgrade can also safeguard the vehicle against obsolescence, guaranteeing compatibility with future audio systems and formats. Overall, an upgraded car stereo greatly enhances the driving experience for drivers and passengers alike.
Picking the Ideal Car Stereo for Your Preferences
Choosing the right car stereo means knowing personal preferences and specific requirements. Shoppers should assess factors such as sound quality, connectivity options, and compatibility with their vehicle. Various models may offer various features, including Bluetooth capability for hands-free calling, USB ports for device charging, and support for streaming services.
Moreover, individuals ought to evaluate the dimensions of the audio unit to ensure it matches their dashboard perfectly. Some may prefer a touchscreen interface for ease of use, while certain buyers may select standard button controls.
Audio output is another essential consideration; those who value superior sound performance should seek out units featuring greater wattage and sophisticated equalization options.
In conclusion, budget plays a significant role in the selection process. By balancing features, quality, and price, individuals can discover the vehicle stereo that best suits their needs, enhancing their driving experience.
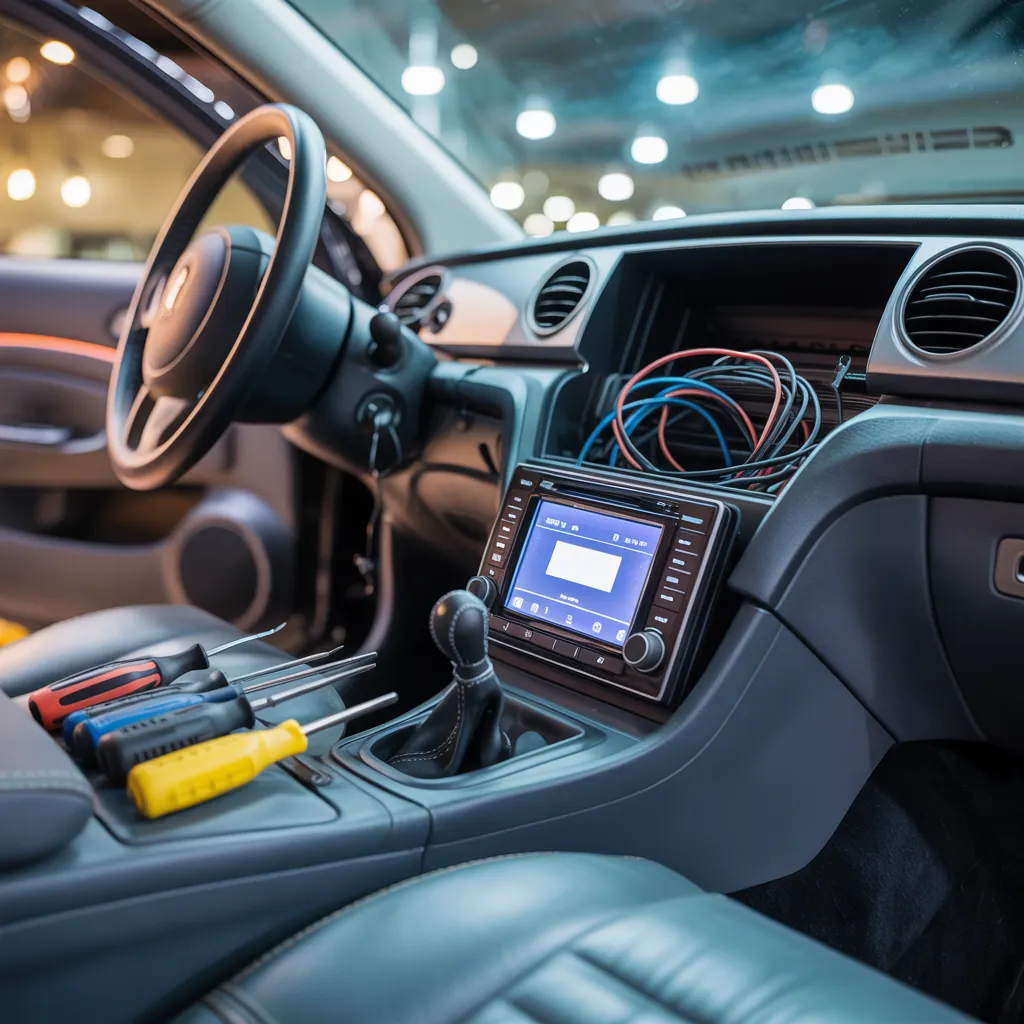
Important Tools for Successful Installation
An effective car stereo installation calls for several key tools to make certain the process runs smoothly and effectively. First, a combination of Phillips and flathead screwdrivers is necessary for removing and securing the stereo unit. Wire strippers and crimpers make wiring connections straightforward, creating a secure and consistent electrical connection. A multimeter proves useful when checking voltage levels, as electrical tape and heat shrink tubing safeguard connections against wear and moisture exposure.
Additionally, a panel removal tool can prevent damage to the dashboard when removing the stereo. Cable ties help with arranging and holding wiring, which is important for keeping the installation tidy. Lastly, having a set of sockets on hand can facilitate the extraction of bolts and screws. By preparing oneself with these essentials, an technician can handle the process with greater confidence and effectiveness.
How to Fit Your New Stereo in a Few Easy Steps
Mounting a new car stereo requires a systematic approach to secure success. Initially, it is essential to collect the required equipment, followed by the proper disconnection of the old stereo. Lastly, correctly linking the new system will complete the setup procedure.
Gather Necessary Tools First
Prior to beginning car stereo installation, it's important to gather all necessary tools to facilitate an efficient process. Key items include a screwdriver kit, usually including Phillips and flat-head types, to remove screws holding the stereo in place. A trim removal tool is necessary for carefully removing dashboard panels without scratching surfaces. Wiring tools and connectors will be necessary for correct wiring and secure connections. In addition, a multimeter is useful for checking that all wiring connections are operating as expected. It's recommended to have cable ties or electrical tape on hand for keeping wires tidy and organized. Finally, a torch can brighten hard-to-see areas throughout the process. By preparing these tools ahead of time, the installation can proceed more smoothly and systematically.
Remove Old Stereo Safely
Cautiously detaching the old stereo is an essential step in the installation process. First, the automobile's battery should be disconnected to eliminate the risk of electrical shocks or shorts. Following that, the detachment of any trim panels surrounding the stereo is required; this is typically done with a panel removal tool to avoid damage. Once the trim is off, fasteners or clips holding the stereo must be removed. With these securing components taken out, carefully extract the stereo from its mounting slot. It is essential to gently remove the wiring harness and antenna cable, ensuring no wires are damaged in the process. After the old stereo is fully detached, it can be placed aside, clearing the way for the new installation.
Connect New Stereo Properly
Once the old stereo has been taken out, attention shifts to connecting the new unit properly. The installer should start by gathering the essential tools, which include wire strippers and connectors. Next, they can refer to the new stereo's wiring diagram, which generally aligns color-coded wires with the vehicle's harness. Proper wire connection is critical; for instance, red usually indicates power, while black represents ground. When the connections are complete, they must be secured using connectors or soldered for long-lasting reliability. The installer should then slide the new stereo into its mounting bracket and confirm it is snugly fit. Finally, reassemble any panels removed during installation, double-checking all connections before powering on the new stereo to verify functionality.
Hook Up Your Stereo: Wiring and Bluetooth Tips
Wiring a car stereo requires grasping key connection points and perfecting the Bluetooth pairing process. Proper installation can boost audio quality, but individuals may experience common issues that demand attention. This overview will present key tips to guarantee a seamless connection and optimal performance.
Key Wiring Connections
When fitting a car stereo, grasping the fundamental wiring connections is vital for achieving maximum performance and functionality. The essential connections encompass power, ground, and speaker wires. The power wire, commonly red, attaches to the vehicle's battery, delivering the essential energy needed for operation. The ground wire, most often black, guarantees the stereo runs without disruption. Speaker wires, frequently color-coded, attach to the speakers, transmitting audio signals. Carefully crimping or soldering these connections is necessary to prevent electrical shorts or sound issues. Furthermore, using a wiring harness can streamline the installation process by offering a plug-and-play solution designed for the vehicle. Confirming these connections are secure and correctly configured will enhance the overall listening experience and longevity of the stereo system.
Bluetooth Connection Process
After securing the needed wiring connections, the following step consists of syncing the car stereo with a handheld device or other Bluetooth-compatible device. Initially, the individual must confirm that Bluetooth is switched on on the device. They should then open the system's Bluetooth options, generally accessible in the primary menu. The stereo will commonly show a selection of nearby devices. The individual identifies their device from this selection. A pairing code may display on both screens; accepting this code establishes the connection. Upon successful pairing, the stereo generally enables music streaming and hands-free calling. It is advisable to test the connection by playing music or making a call to verify that call quality and functionality meet expectations.
Resolving Frequent Problems
Addressing typical challenges with car stereo installations requires a systematic approach to identify and resolve problems efficiently. To begin, ensure that all wiring connections are tight and correctly aligned with the vehicle's wiring diagram. Faulty or mismatched connections may result in power loss or poor audio quality. If the stereo fails to power on, check the fuse and the vehicle's battery. When experiencing Bluetooth connectivity difficulties, verify the device is in pairing mode and adequately close. Furthermore, ensure the stereo's firmware has been updated to the latest version. When sound quality is lacking, examine the speaker connections and audio settings. Lastly, referring to the user manual can offer targeted troubleshooting guidance suited to the stereo model, improving the overall installation process.
The Top 5 Installation Mistakes to Watch Out For
Even though putting in a car stereo seems easy, numerous people unintentionally commit serious errors that can lead to poor performance or even damage to the vehicle. A frequent mistake involves failing to disconnect the battery, which may result in electrical shorts or dangerous shock. An additional misstep is neglecting to accurately match the stereo's power specifications and connections, leading to inadequate sound quality or system failure.
Moreover, not using the correct tools can result in stripped screws or damaged components. Ignoring compatibility with the vehicle's current system is a common mistake; using a stereo that doesn't fit can lead to installation issues. To conclude, poor speaker placement can negatively impact sound quality and audio performance. By steering clear of these five common errors, individuals can ensure a more seamless installation and experience superior audio quality in their vehicles.
Frequently Asked Questions
Can I Install a Car Stereo Without Professional Help?
Absolutely, a car owner can set up a car audio system without the help of a professional. With the proper tools, directions, and a little dedication, most people succeed in finishing the installation on their own, upgrading their vehicle's audio experience.
How Long Does a Car Stereo Installation Typically Take?
Car stereo installation generally requires anywhere from one to four hours, influenced by the complexity of the setup and the specific make and model of the vehicle. The experience of the installer and the tools on hand can also affect how long the process takes.
What Are the Signs That It Is Time for a New Car Stereo?
Telltale signs that signal the necessity of a new car stereo include continuous sound quality issues, failure to connect external devices, constant Bluetooth connectivity failures, malfunctioning controls, and an obsolete user interface. These concerns tend to negatively impact the overall driving experience and enjoyment.
Can Upgrading My Stereo Impact My Vehicle's Warranty?
Modifying a car stereo may impact the vehicle's warranty, particularly if the setup results in damage or if particular elements are impacted. You are encouraged to consult the warranty documentation or a dealership for further guidance.
Can My Old Speakers Be Used With a New Stereo System?
Older speakers can frequently be repurposed with a new stereo system, provided they are compatible. That said, checking their condition and verifying they align with the new system's power and impedance demands is necessary for the best results.